Getting started
Connect-Swift is a small library (<200KB!) that provides support for using generated, type-safe, and idiomatic Swift APIs to communicate with your app's servers using Protocol Buffers (Protobuf). It works with the Connect, gRPC, and gRPC-Web protocols.
Imagine a world where you can jump right into building products
and focus on the user experience without needing to handwrite REST/JSON
endpoints or models that conform to Codable — instead using generated APIs
that utilize the latest Swift features and are guaranteed to match the server's
modeling. Furthermore, imagine never having to worry about serialization again,
and being able to easily write tests with generated mocks that conform to the
same protocol as the real implementations.
All of this is possible with Connect-Swift.
In this guide, we'll use Connect-Swift to create a chat app for ELIZA, a very simple natural language processor built in the 1960s to represent a psychotherapist. The ELIZA service is implemented using Connect-Go, is already up and running in production, and supports both the gRPC-Web and Connect protocols - both of which can be used with Connect-Swift for this tutorial. The APIs we'll be using are defined in a Protobuf schema that we'll use to generate a Connect-Swift client.
This tutorial should take ~10 minutes from start to finish.
Prerequisites
- The Buf CLI installed, and include it in the
$PATH.
Define a service
First, we need to add a Protobuf file that includes our service definition. For this tutorial, we are going to construct a unary endpoint for a service that is a stripped-down implementation of ELIZA, the famous natural language processing program.
$ mkdir -p proto && touch proto/eliza.proto
Open up the above file and add the following service definition:
syntax = "proto3";

package connectrpc.eliza.v1;

message SayRequest {
  string sentence = 1;
}

message SayResponse {
  string sentence = 1;
}

service ElizaService {
  rpc Say(SayRequest) returns (SayResponse) {}
}
Open the newly created eliza.proto file in the editor.
This file declares a connectrpc.eliza.v1 Protobuf package,
a service called ElizaService, and a single method
called Say. Under the hood, these components will be used to form the path
of the API's HTTP URL.
The file also contains two models, SayRequest and SayResponse, which
are the input and output for the Say RPC method.
Generate code
We're going to generate our code using Buf, a modern replacement for Google's protobuf compiler. We installed Buf earlier, but we also need a few configuration files to get going.
First, scaffold a basic buf.yaml by running buf config init at the root of your repository. Then, edit buf.yaml
to use our proto directory:
version: v2
modules:
  - path: proto
lint:
  use:
    - DEFAULT
breaking:
  use:
    - FILE
Next, tell Buf how to generate code by putting this into
buf.gen.yaml:
version: v2
plugins:
  - remote: buf.build/connectrpc/swift
    out: Generated
    opt:
      - GenerateAsyncMethods=true
      - GenerateCallbackMethods=true
      - Visibility=Public
  - remote: buf.build/apple/swift
    out: Generated
    opt: Visibility=Public
With those configuration files in place, we can now generate code:
$ buf lint
$ buf generate
In your Generated directory, you should now see some generated Swift files:
Generated
    ├── eliza.connect.swift
    └── eliza.pb.swift
The .connect.swift file contains both a Swift protocol interface for the
ElizaService, as well as a production client that conforms to this interface.
The .pb.swift file was generated by Apple's
SwiftProtobuf plugin and contains the corresponding Swift
models for the SayRequest and SayResponse we defined in our Protobuf file.
Add the Connect Swift package
We're ready to create the app that will consume these generated APIs. Open
Xcode and create a new SwiftUI project called Eliza.
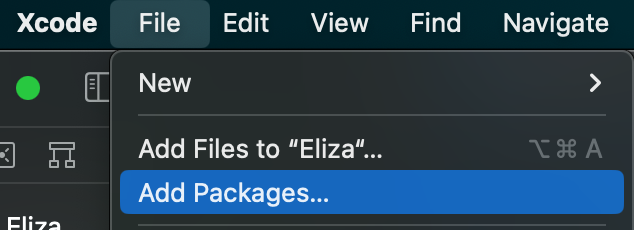
Next, add a dependency on the Connect-Swift package in Xcode by clicking
File > Add Packages...:

In the popup window, click into the Search or Enter Package URL text field
in the top right and paste the Connect-Swift GitHub URL:
https://github.com/connectrpc/connect-swift
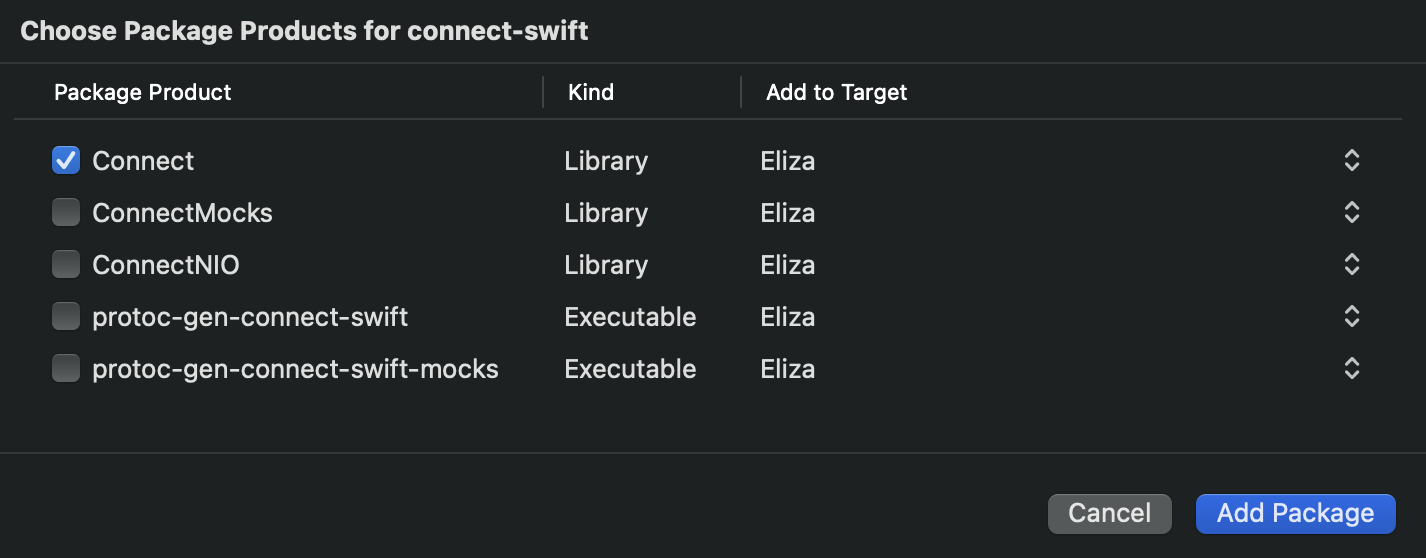
Ensure the Connect library is selected, then
click Add Package to confirm the package addition. Note that this will
automatically add the required SwiftProtobuf package as well:

If you'd like to use gRPC as the transport protocol, you must also include the
ConnectNIO library from the Connect-Swift package which provides support
for gRPC by using SwiftNIO for trailers.
This dependency is
not necessary when using the Connect or gRPC-Web protocol.
Alternative: Use CocoaPods
CocoaPods is also supported as an alternative to Swift Package Manager.
To use Connect-Swift with CocoaPods, simply add this line to your Podfile:
pod 'Connect-Swift'
pod 'SwiftProtobuf'
Although Connect-Swift provides support for both the Connect and the gRPC-Web protocols through CocoaPods, gRPC support is only available when using Swift Package Manager due to the fact that SwiftNIO does not support CocoaPods.
Integrate into the app
First, add the generated .swift files from the previous steps to your
project:
- Drag the
Generateddirectory into Xcode and drop it alongside theContentView.swiftfile. - When prompted, ensure that
Elizais selected underAdd to targets:in Xcode. This will make sure the generated sources get compiled into your application target. - Click
Finishin the Xcode prompt.
At this point, your app should build successfully.
To create the chat view, replace the contents of ContentView.swift with:
Click to expand ContentView.swift
ContentView.swiftimport Combine
import SwiftUI
struct Message: Identifiable {
enum Author {
case eliza
case user
}
typealias ID = UUID // Required for `Identifiable`
let id = UUID()
let message: String
let author: Author
}
final class MessagingViewModel: ObservableObject {
private let elizaClient: Connectrpc_Eliza_V1_ElizaServiceClientInterface
@MainActor @Published private(set) var messages = [Message]()
init(elizaClient: Connectrpc_Eliza_V1_ElizaServiceClientInterface) {
self.elizaClient = elizaClient
}
func send(_ sentence: String) async {
let request = Connectrpc_Eliza_V1_SayRequest.with { $0.sentence = sentence }
await self.addMessage(Message(message: sentence, author: .user))
let response = await self.elizaClient.say(request: request, headers: [:])
await self.addMessage(Message(
message: response.message?.sentence ?? "No response", author: .eliza
))
}
@MainActor
private func addMessage(_ message: Message) {
self.messages.append(message)
}
}
struct ContentView: View {
@State private var currentMessage = ""
@ObservedObject private var viewModel: MessagingViewModel
init(viewModel: MessagingViewModel) {
self.viewModel = viewModel
}
var body: some View {
VStack {
ScrollViewReader { listView in
// ScrollViewReader crashes in iOS 16 with ListView:
// https://developer.apple.com/forums/thread/712510
// Using ScrollView + ForEach as a workaround.
ScrollView {
ForEach(self.viewModel.messages) { message in
VStack {
switch message.author {
case .user:
HStack {
Spacer()
Text("You")
.foregroundColor(.gray)
.fontWeight(.semibold)
}
HStack {
Spacer()
Text(message.message)
.multilineTextAlignment(.trailing)
}
case .eliza:
HStack {
Text("Eliza")
.foregroundColor(.blue)
.fontWeight(.semibold)
Spacer()
}
HStack {
Text(message.message)
.multilineTextAlignment(.leading)
Spacer()
}
}
}
.id(message.id)
}
}
.onChange(of: self.viewModel.messages.count) { messageCount in
listView.scrollTo(self.viewModel.messages[messageCount - 1].id)
}
}
HStack {
TextField("Write your message...", text: self.$currentMessage)
.onSubmit { self.sendMessage() }
.submitLabel(.send)
Button("Send", action: { self.sendMessage() })
.foregroundColor(.blue)
}
}
.padding()
}
private func sendMessage() {
let messageToSend = self.currentMessage
if messageToSend.isEmpty {
return
}
Task { await self.viewModel.send(messageToSend) }
self.currentMessage = ""
}
}
Lastly, replace the contents of ElizaApp.swift with:
Click to expand ElizaApp.swift
ElizaApp.swiftimport Connect
import SwiftUI
@main
struct ElizaApp: App {
@State private var client = ProtocolClient(
httpClient: URLSessionHTTPClient(),
config: ProtocolClientConfig(
host: "https://demo.connectrpc.com",
networkProtocol: .connect, // Or .grpcWeb
codec: ProtoCodec() // Or JSONCodec()
)
)
var body: some Scene {
WindowGroup {
ContentView(viewModel: MessagingViewModel(
elizaClient: Connectrpc_Eliza_V1_ElizaServiceClient(client: self.client)
))
}
}
}
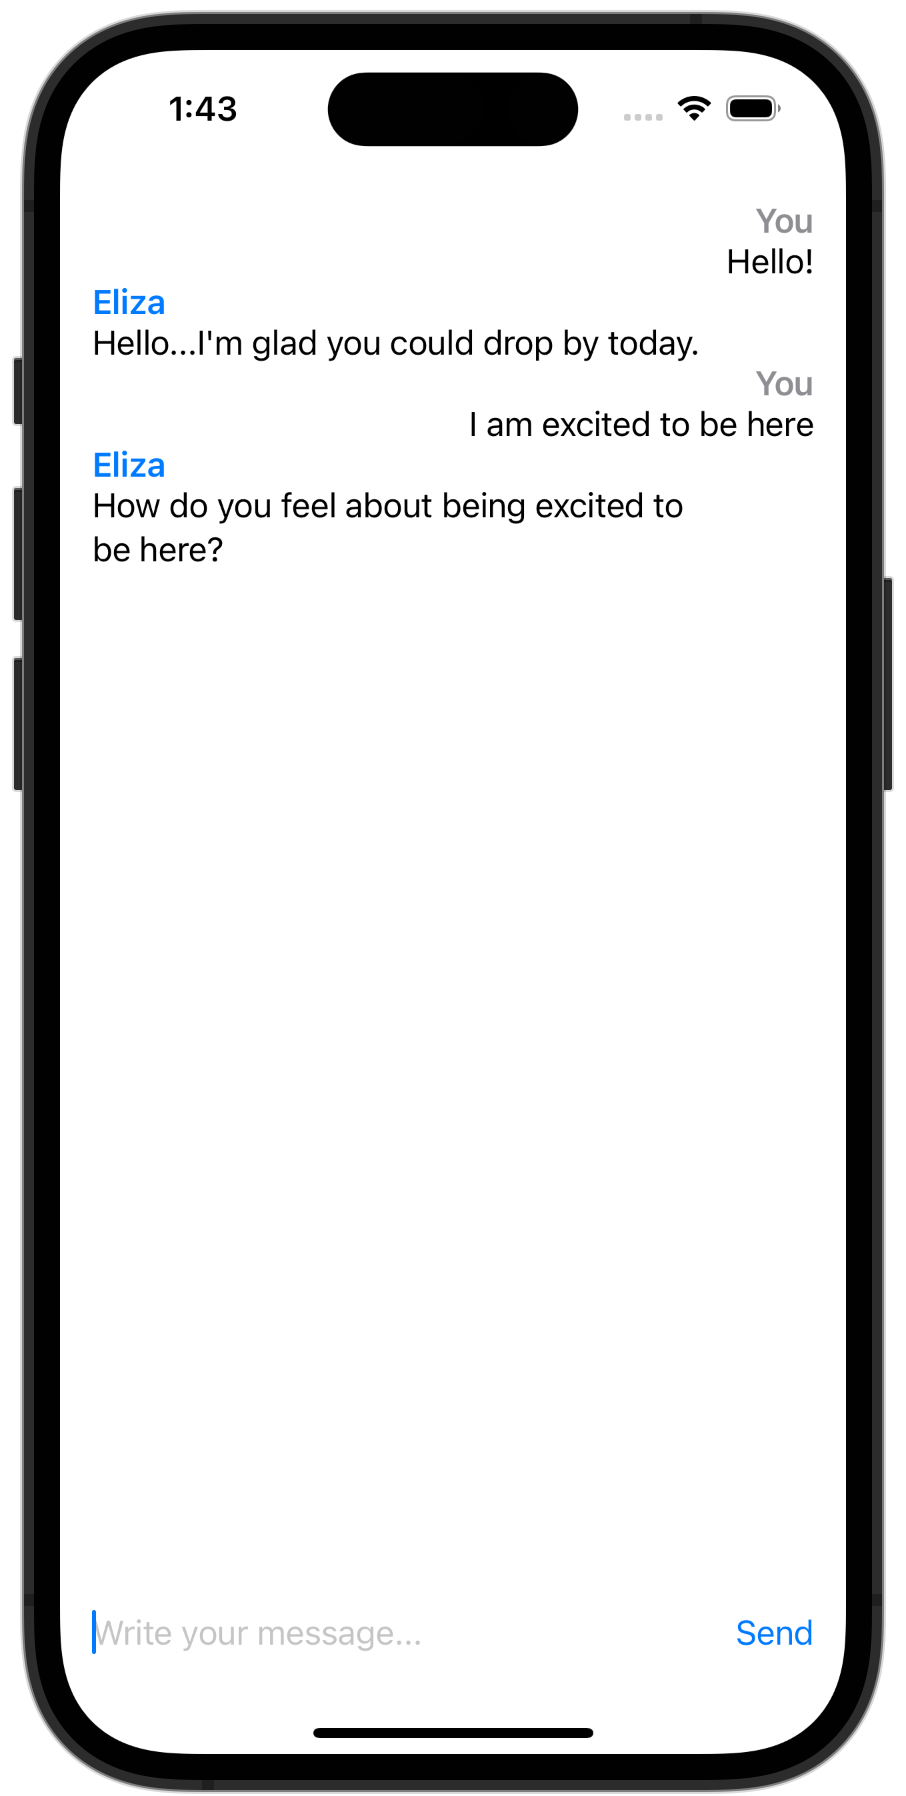
Build and run the app, and you should be able to chat with Eliza! 🎉

Breaking it down
Let's dive into what some of the code above is doing, particularly regarding how it is interacting with the Connect library.
Creating a ProtocolClient
First, the ElizaApp creates and stores an instance of ProtocolClient.
This type is configured with various options specifying which HTTP client should
be used (the default being URLSession), how data should be encoded/decoded
(i.e., JSON or Protobuf binary), and which protocol to use (in this case,
the Connect protocol).
If we wanted to use JSON instead of Protobuf and to enable request gzipping, we'd only need to make a simple 2 line change:
private var client = ProtocolClient(
    httpClient: URLSessionHTTPClient(),
    config: ProtocolClientConfig(
        host: "https://demo.connectrpc.com",
        networkProtocol: .connect,
        codec: JSONCodec(),
        requestCompression: .init(minBytes: 50_000, pool: GzipCompressionPool())
    )
)
The HTTP client's behavior can be customized by subclassing
the URLSessionHTTPClient, by using the NIOHTTPClient from the ConnectNIO
library, or by creating a new type that conforms to the HTTPClientInterface
protocol and passing it as the httpClient. For more customization options,
see the documentation on using clients.
Using gRPC
If you'd like to use gRPC as the transport protocol in the above example,
simply change the following lines after ensuring you have
included the ConnectNIO library dependency:
Click to expand
import ConnectNIO

...

private var client = ProtocolClient(
    httpClient: NIOHTTPClient(host: "https://demo.connectrpc.com"),
    config: ProtocolClientConfig(
        host: "https://demo.connectrpc.com",
        networkProtocol: .grpc,
        codec: JSONCodec(),
        requestCompression: .init(minBytes: 50_000, pool: GzipCompressionPool())
    )
)
Using the generated code
Take a look at the MessagingViewModel class above. It is initialized with an
instance of a type that conforms to
Connectrpc_Eliza_V1_ElizaServiceClientInterface - the Swift protocol
that was generated from the ElizaService Protobuf service definition.
Accepting a protocol, rather than the
generated Connectrpc_Eliza_V1_ElizaServiceClient
concrete type that conforms to the protocol, allows for injecting mock classes
into the view model for testing. We won't get into mocks and testing here, but
you can check out the testing docs for details and examples.
Whenever the send(...) function is invoked by the SwiftUI view, the
view model creates a Connectrpc_Eliza_V1_SayRequest and
passes it to the say(...)
function on the generated client before awaiting a response from the server.
All of this is done using type-safe generated APIs from the Protobuf
file we wrote earlier.
Although this example uses Swift's async/await APIs, traditional
closures/callbacks can also be generated by Connect-Swift, and opening up the
generated .connect.swift file will reveal both interfaces. This behavior
can be customized using generator options.
More examples
There are more detailed examples that you can explore within the Connect-Swift repository on GitHub. These examples demonstrate:
- Using streaming APIs
- Integrating with Swift Package Manager
- Integrating with CocoaPods
- Using the Connect protocol
- Using the gRPC protocol
- Using the gRPC-Web protocol
Using gRPC or gRPC-Web
Connect-Swift supports the Connect, gRPC, and gRPC-Web protocols. Instructions for switching between them can be found here.
We recommend using Connect-Swift over gRPC-Swift even if you're using the gRPC protocol for a few reasons:
- Idiomatic, typed APIs. No more hand-writing REST/JSON endpoints and
Codableconformances. Connect-Swift generates idiomatic APIs that utilize the latest Swift features such as async/await and eliminates the need to worry about serialization. - First-class testing support. Connect-Swift generates both production and mock implementations that conform to the same protocol interfaces, enabling easy testability with minimal handwritten boilerplate.
- Easy-to-use tooling. Connect-Swift integrates with the Buf CLI, enabling remote code generation without having to install and configure local dependencies.
- Flexibility. Connect-Swift uses
URLSession. The library provides the option to swap this out, as well as the ability to register custom compression algorithms and interceptors. - Binary size. The Connect-Swift library is very small (<200KB) and does not require any third party networking dependencies when using it with the Connect and gRPC-Web protocols. When using it with gRPC, the binary size is a bit bigger (~2.4MB) due to the SwiftNIO dependency which is required to support HTTP trailers.
If your backend services are already using gRPC today, Envoy provides support for converting requests made using the Connect and gRPC-Web protocols to gRPC, enabling you to use Connect-Swift without the SwiftNIO dependency.